Hey everyone! I finally got Internet back at my house! Woo! lol It's been too long since I made a post. I'm almost finished reviewing over the new products that I recently got (yeah I know I got more stuff) so I really can't wait to share my reviews with you all. I have also updated my skin regime so you will also be seeing a post about that soon. For now, I decided to share these photos of the outfits that I wore to school and work these past couple of days. Summer is officially over but I was able to wear these cute outfits that really show off my legs and curves.
Outfit #1
Sweaterdress from Papaya
Belt from Body Central
Tights from Forever 21
Wedges from Burlington
Outfit #2
Shirt from Papaya
Skirt from Forever 21
Christian Siriano shoes from Payless
Outfit #3
Blouse from Charlotte Russe
Skirt form Charlotte Russe
Shoes from Payless
For the accessories, I decided to show them in the next post. I bought a lot of earrings, necklaces, and rings that will add that touch of sparkle to any outfit so be sure to be on the lookout for that post. Well gotta go but I hope to see you all in my next post! :)
xoxo,
Sammy
P.S. Thank you all for checking out my blog while I was offline and I would also like to welcome new followers to my page! Be sure to stay tuned! :)
Hello wonderful people! I was looking through my posts and I found this old post that I had forgotten all about. Hehe silly me ^-^; So today I decided to share with you all my hair regime. I get a lot of comments about my hair and how I take care of it so here we go.
First off, I am half Burmese and half black (most people call me Blasian though lol) so my hair is naturally curly from my father's side. It takes a lot of work to keep my hair the way it is now. Every 3-4 months I have to get my hair permed in order to keep the roots straight and flat for me to flat iron the rest of my obnoxious hair. My mom does the best perms ever with a $5 perming kit from the local beauty supply store. What's the kit? It's Luster's Pink Smooth Touch Relaxer Kit in Regular.
'If you ever need a perm, you should go talk to my mom lol. Anywho, it can take up to 3-4 hours to fully perm, rinse, condition, blow-dry, and straighten my hair in one day depending on the length of my hair. Since my mom bought hair extensions, I'll probably be cutting it short from now on to avoid lengthy perming days.
Second, I don't use any ordinary hair straightener. The straightener I use is the Maxius Maxiglide Xpress Flat Iron.
You can buy this straightener on www.maxiusbeauty.com for $59.95 but I bought mine on QVC for a lower price. This straightener has little teeth-like pins to detangle and smooth out hair as it straightens and it has a built-in steam burst to hydrate the hair. This baby is my life savior. It literally takes less time to straighten my hair with this straightener than with other straighteners. I don't use it on a daily basis. Just only on days after I've washed my hair. I just use a regular flat iron to get rid of any kinks in my hair and then I'm good to go.
Third, I use the Wen Haircare Cleanser by Chaz Dean to wash and condition my hair. Again, I bought this on QVC for $40 rather than buying it at his site www.wenhaircare.com.
Other shampoos and conditioners leave residue in my hair and don't fix the tangles and knots that come with washing hair but this cleanser is completely different. It is a shampoo, a condition, a detangler all in one. It uses herbs and natural oils to cleanse and condition the hair all in one step. It doesn't lather up but it does create a sensational foam that you massage right into your scalp, making you feel like you're in heaven. Here are some pics of me after I've used Wen:
This was way earlier in the year when I had dyed my hair red. The color had faded out fast but I was surprised after using Wen to see that there were still some red parts in my hair. It really made the faded red color pop out more.
In flash photography
The results? Hair color pops out more, the hair itself is loses that dry straw look, and it's super soft and silky to the touch. Wen Haircare has many products to tend to each kind of hair: dry, oily, thick, damaged, and normal but for me I tend to use the Fig cleanser which is suited for thick hair that needs moisture. Both my mom and I have been using this product since Christmas and it is an absolute necessity for my hair regime. I can't live without it!
And that is the end of my hair care regime. :) Does anyone else use any of these products? What do you all think about them?
Helloo everyone! I wanted to make a quick update and let you all know that I still do not have Internet back at my house and am currently using Blogger at my boyfriend's house. :/ It really sucks because I have been so anixous to create ANOTHER haul post with new polishes, skin care products, clothes, accessories, and etc. I'm currently looking for a new camera to take pics of all of my new goodies so I'd really appreciate it if you all could tell me reccomendations for a good camera. Well, gotta go for now but hopefully I will be up and posting more soon. ;)
Hi everyone! I am so so so sorry that I wasn't able to post this haul up yesterday. I came home from work yesterday only to find out that the Internet at my house went out. :/ I don't know how long it'll be 'til I get it back but until then I'll just have to be doing my posts at my boyfriend's house. Anyhow, I know you all have been waiting to see what I bought lately and I can't hold the secret haul anyone. Teehee :) Here is the makeup haul you all have been waiting for!!!
Shatter polish by OPI. Just add one coat of this to your base coat and watch as it "shatters" before your very eyes. Below I used a white base coat and topped it off with the shatter polish.
Revlon ColorBlast Lipstick in Candy Pink
A very bright, pink color that's perfect for going out to clubs and raves. Very vibrant color yet the feel of the lipstick is very smooth and creamy.
MAC matte lipstick in Ruby Woo. This lipstick smells, yes I said smells, and feels creamy. The color stays on for 24 hours and if you want to add a bit of shine to it, you can top it off with clear lipgloss. :)
Urban Decay 24/7 Glide On Shadow Pencil in Rehab. I really like this pencil. I can just color it on myeyelids, smudge it a bit, and I'm good to go as far as eyeshadow. It really lasts a long time so I was impressed by this product.
In Natural Light
In Flash
EOS Lipbalm in Honeysuckle. Soothes and softens lips. Perfect for primming your lips before applying on lipgloss or lipstick.
Smashbox's Bionic Mascara. This mascara gives max volume to your lashes. I showed my mom my lashes after I applied the mascara on and she thought I was wearing falsies. lol
Ardell Fashion Lashes. I haven't used these pair yet but I have used a similar pair before and I gotta say they are a really good brand to use.
Sally Hansen Nail Art Pen in Pink. I will be using this in a future tutorial really soon so you all will be able to see the results. The pen itself is really cute and doesn't make a mess when drawing on your nails.
Smashbox's O-Gloss
Just apply a little bit on your lips and watch as the gloss goes on from clear to your very own custom shade of pink lipgloss!
And that is the end of my haul. So has anyone else tried any of these products? What do you think of them?
Before I go, I just wanted to say that I can't believe that I'm close to having 50 followers on my blog! I'm so estatic! I would love to host a contest right now but I think I'm going to keep waiting until I hit 100 followers for my first contest so be sure to stick around for that. Until next time!
Hello everyone! So as you can tell from the title, I got a haircut. It's been a couple of months since my last haircut....ok so maybe more than a couple of months. lol I really needed a trim though seeing as I constantly blow-dry and straighten my hair. As for my hair itself, it was a disaster to deal with. My ends were as dry as straw, a majority of them had split ends, and the overall look of it was dull. So I went to my local hair salon, Salon Amore, looked through the magazines for a cut that would be flattering for my face, and found the perfect cut for me.
So here is the before and after pics:
I got about 2 inches off for a more healthier look. My bangs and layers were reshaped and the ends were curled in a bit to finish off the look.
I really like the cut overall. It's definitely going to make shampooing and styling my hair a lot easier and more managable. What do you all think about my new look? Comments are always welcome.
I've finally finished testing out the new makeup products that I bought so that post will be up tomorrow. I definitely can't wait to show you all what I got! :)
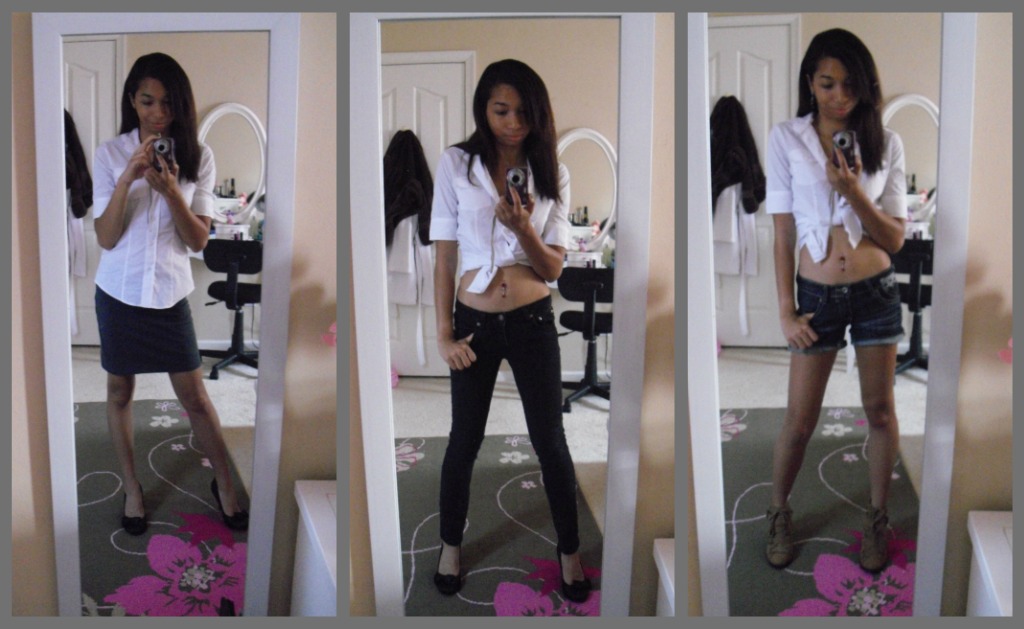
Hello everyone! Just thought I'd do a quick OOTD for you all while you wait for my shopping haul. I got so much stuff so it's taking me a while to test the products and snap some pics. In the meantime, I took a white button down shirt and created three cute outfits to wear with it. :)
Wardrobe Used in these Outfits of the Day: Outfit #1:
Shirt is from New York & Company
Skirt is from Forever 21
Shoes are from Burlington Coat Factory
Outfit #2:
Shirt is from New York & Company
Jeans are from Forever 21
Shoes are from Burlington Coat Factory
Outfit #3:
Shirt is from New York & Company
Shorts are from Body Central
Shoes are from Charlotte Russe
Outfits #2 and #3 were inspired by the outfits that Hyuna wore in her Bubble Pop! music video. :)
Hola everyone! Can you believe it? The last Harry Potter movie comes out tomorrow! I'm so estatic! Who's going to see it tomorrow? Anyone? Well anyways I know I haven't been updating my blog lately so I decided to post up my OOTD that I wore to work today.
Wardrobe Used in this OOTD:
Top is from Body Central
Skirt is from JC Penny's
Shoes are from Steve & Barry's
Just a simple business casual outfit. No biggie. I do however have a makeup and nail polish haul coming up soon since I got paid last Friday and went on my little shopping spree. I will be posting that up real soon so stay tuned. :)
Yo! It's been a while. hehe sorry I've been offline for the past couple of weeks but I have an excuse. Ready? Can I get a drumroll please? I finally got a job!!!! Yipeee! lol Yep that's right I finally got a job for the summer as administrative assistant for a company. Even though I will be working over the summer, I'm going to try really hard to post up new looks, OOTDs especially for work, and reviews on new products that I will be purchasing soon but for now here is another new look that you all can try. :)
2NE1 just recently released their new single, "I Am the Best" as well as the mv to it on YouTube. Before the debut of the mv, they had been teasing their fans on their YouTube channel with the promo poster and audio clips for the single. So while I was anxiously waiting for the single to come out, I thought it'd be awesome to recreate their cartoon promo poster look instead.
While I am still listening to this song over and over again (to the point that it's stuck in my head), the poster itself is very eye-catching and reminds me of the powerpuff girls. It's cute yet mischievous and fierce at the same time.
Products Used in this Tutorial:
Clinique concealer in 05 Medium Beige
bare Minerals foundation powder in Summer Bisque
bare Minerals Mineral Veil
Ulta eyeshadow kit (teal, matte blue, navy blue, and black)
Smashbox Lash DNA mascara
Ulta gel eyeliner in black
Victoria's Secret Blush in In Lust
Victoria's Secret lipstick in Kiss Me
Start off with a clean and moisturized face. Fill in the brows with an eyebrow pencil or powder since they will be framing your whole face at the end of this tutorial. Take your favorite concealer and apply it under your eyes as well as around the nose and corners of your mouth to cover up dark spots and shadows. Set your face ready for makeup by applying on foundation for even coverage and a clear canvas.
Next take a matte blue eyeshadow and apply all over your lids. This will be a base color for the lighter and darker shades of blue. With a teal blue color, apply to the inner corners of your eyes and blend it out. Now with a navy blue color, apply to the outer V as well as the crease of your eyes and gently blend it out to create a smokey effect. Now with a black eyeshadow, lay it over the navy blue to intensify the look. Line your upper lashline with either a black gel eyeliner or liquid eyeliner and about 3/4's of your lower lashline with a black eyeliner pencil. To make the look bolder and more dramatic, take a Q-tip and load it up with the navy blue and black eyeshadows and line the lower lashline. Be sure to connect the eyeliners together to make the look complete. Add false lashes before curling and coating your lashes with mascara.
Curl your lashes and coat them with your favorite volumizing mascara. Finally apply a pink blush to the apples of your cheeks and fill in your lips with a pink lipstick and you're done! :)
And here is the final look:
A look that's perfect for a night to the club or a party. Your eyes will look very dramatic and bold in these shades of blue. I hope you all will enjoy this look. :) Until next time!
Hello everyone! Schools are finishing up and summer is aobut to start in a few days but I'm still keeping the creative juices flowing. I was recently watching a makeup tutorial video by the one and only Michelle Phan (I'm a big fan. I've been watching her channel since I was a senior in high school ^_^) and as I watched it I thought it'd be neat to transform into her for the day. With my makeup and brushes I went from Sammy to Michelle in no time! :)
Here's the video of her look:
Some more pics of the transformation:
Pretty cool, huh? I even had some fun recreating her outfit. In the photo that she posted on her Facebook fanpage, it only shows the top portion of her body, so I used my creativity and had fun dressing up the bottom portion.
Wardrobe Used in this Transformation:
Shirt from New York & Company
Scarf from New York & Company
Capris from Aeropostale
Ballet Flats from Target
Pants from JC Penny's
Shoes from Steve & Barry's
Which outfit do you guys like better? Personally I like the capris one for a casual day but the pants one for business and work. :)
Even though this look is gorgeous on Michelle it still looks good on lil' me.
Good afternoon everyone! Today's tutorial is a bit different from my normal tutorials. DSK's Steph is holding a contest where you create a detailed FOTD. I thought it'd be pretty neat to enter so here is my entry for the contest.
For my look, I was inspired by the song Angels by Hope (if you have ever played Sims 2 Castaways they play the song there in Simish language) as well as the beauty of sunflowers. I really wanted to keep the look soft and feminine but still show the beautiful radiance of a sunflower in my makeup.
Products Used in this Tutorial:
Clinique concealer in 05 Medium Beige
bare Minerals foundation powder in Summer Bisque
bare Minerals Mineral Veil
Smashbox Brow Tech & Cream Eye Liner Palette
Ulta eyeshadow kit (gold and matte brown)
Victoria's Secret Beauty Rush eyeshadow in Money Baby Smashbox Lash DNA mascara
Ulta bronzer in Afterglow
Sephora's lipgloss in Aztec Gold
Starting off with a clean and moisturized face, apply a yellow toned concealer to hide dark spots and shadows around the eyes, nose, and mouth. Use foundation to blend the concealer and to set your face ready for makeup. Be sure to fill in your brows with an eyebrow pencil or powder since they will be framing your face.
Take a matte brown eyeshadow and apply to the inner corners of your eyes. Next, take a gold eyeshadow and apply to the middle of your eyes and gently blend it in with the brown eyeshadow. Now with a bright green eyeshadow, apply to the outer corners of your eyes by tracing the outer V. This will make your eyes look like they are surronded by leaves. Very lightly blend the green eyeshadow a bit to mesh well with the rest of your eyes.
Now with an eyeliner brush loaded with brown gel eyeliner, line the upper lash lines. Curl your lashes and apply on mascara. I didn't have any brown mascara so I opted for black instead. I wanted to go for a glowy complexion, so with your favorite bronzer apply to the apples of your cheeks and gradually build up the color to your desire. Finally take a lipgloss with a golden tone to it and apply to your lips. Now you're finished. :)
Here is the final look:
These feathers came from my masquerade mask and I couldn't bear to throw them away since they were such a pretty green color so I decided to be creative and stick them in my hair. :)
Questions for the Contest:
1.) I originally found your jewelry blog through one of Bubzbeauty's videos a year or two ago. Your beauty blog on the other hand I saw on your jewelry blog :)
2.) I currently do not own any Sigma brushes
3.) I absolutely love my Smashbox Lash DNA mascara. It really gives my eyes more volume for a more dramatic look. :)
For those who still want to enter, the deadline is June 10th Seattle time but I encourage you all to be creative and unique :) I hope you all enjoy wearing this look throughout the summer.