Followers

Thursday, March 31, 2011

1st Bloggers' Choice Makeup Tutorial: KARA "Lupin" Makeup Tutorial

Goooood evening everyone! Remember the poll on the sidebar that asked which Kpop/Jpop Celebrity Look should I do?  Well here it is :) The winner of the 1st Bloggers' Choice Makeup Tutorial is.....KARA!!!!! And what better tutorial to do than the makeup they wore in the Lupin music video. :)


The look in this video is very dark and sophisticated yet very sexy.  I believe when this video came out other groups such as Girl's Generation and T-ara were making videos similar to this: feminine, dark, and alluring.  I have to say, I look the whole look of their video and the song is very contagious.


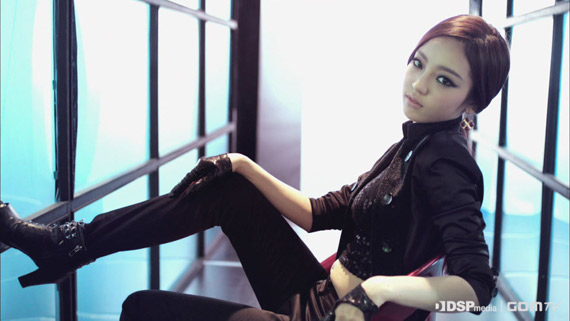
Goo Hara is my fave out of the five girls ^-^

And for those who haven't seen the music video, here it is:


Products used in this Tutorial:
NARS Smudge Proof Eyeshadow Base
Clinique concealer in 05 Medium Beige
bare Minerals foundation powder in Summer Bisque
bare Minderals mineral veil
Smashbox Brow Tech & Cream Eye Liner Palette
Ulta eyshadow kit (colors: shimmering cinammon, metallic dark brown, matte dark brown, and black)
Revlon eyeliner pen
Ulta eyeliner pencil in Black
Smashbox Lash DNA mascara
Ulta blush in pale rose
Victoria's Secret lipgloss in Toy

So first off, wash your face and be sure to use a good moisturizer.  Fill in your brows with an eyebrow pencil or powder because they will be framing your face.  Use a yellow toned concealer to cover up those dark spots and shadows and use a finishing powder to set your face.

Now take a shimmering cinammon color and fill in half of your eyes, from the inner corner to the middle of your eyes.  Next with a a metallic dark brown eyeshadow, fill in the other half of your eyes which should be going from the middle of your eyes to the outer corners.  Blend the two colors together to remove harsh lines. Take a matte dark brown color and outline the outer corners of your eyes then take your index finger and blend it out to create a smokey effect.  With a black eyeliner pen, outline the upper lash line then take a black eyeliner pencil and line the lower lashline.  Take a bit of black eyeshadow and go over the eyeliner and carefully blend/smudge it to darken your lines.  Curl your lashes and apply your favorite mascara.

With a pale pink blush, apply it to the apples of your cheeks.  We don't need a lot of blush for this look so lightly brush it on your cheeks. Finally, take a bubblegum pink lipgloss and apply it to your lips for the finishing touch.  Now you're finished! :)

And here is the final look:


Recreating their wardrobe was fun.  I even did Goo Hara's puff in the video. It didn't really suit me (it looks so much better on her hehe).


Wardrobe for this Look:
Blazer from New York & Company (size sm)
Sequined tanktop from Forever 21 (size sm)
Jeans from Forever 21 (size 0)
Boots from Rainbow (size 7)

I even did some photoshopping to give it a "Lupin" cover feel to it. :)


I had a lot of fun recreating this look and I hope you all too.  Good night!

P.S. Be sure to vote in the poll on the sidebar for the next Bloggers' Choice Makeup Tutorial!!!

Tuesday, March 29, 2011

Under the Starry Sky Prom Tutorial

Hello everyone!  I hoep everyone is having a good day.  I've had a rough weekend but I'm all good now. :)

 Before getting started with this tutorial, I wanted to say that I have now created a Facebook fanpage incase you all wanted to see sneak peeks of upcoming tutorials as well as leave comments and requests on what you'd like to see next. :)

Also I have created a new poll on my sidebar for the next Bloggers' Choice Tutorial #2 only this time it's asking about spring flowers.  I'm so exicted to see what you all pick and encourage you all to vote :)  Don't worry the Bloggers' Choice Tutorial #1 will be coming up real soon.  Eager to see who won?  Stay tuned! ;)

So since prom will be coming up soon I decided to make a tutorial just for the occasion.  This look is very classical yet romantic and goes well with dresses that are black, white, and silver. Your eyes will glisten in the moonlight while sporting this prom look.


Products Used in this Tutorial:
NARS Smudge Proof Eyeshadow Base
Clinique concealer in 05 Medium Beige
bare Minerals foundation powder in Summer Bisque
bare Minderals mineral veil
Smashbox Brow Tech & Cream Eye Liner Palette
Ulta eyeshadow kit (white, shimmering silver, gunmetal grey, and black)
Revlon eyeliner pen
Ulta eyeliner pencil in Black
Smashbox Lash DNA mascara
Utla bronzer
Smashbox lipgloss in apricot

Before we start, you may want to tidy up your eyebrows because they will be framing your face once this look is complete.  Neatly tidy brows really do make a difference.  Also, make sure that your face has been washed with your favorite cleanser and moisturized. Now that that has been settled, use concealer to cover up dark spots and shadows.  Since the shadows under your eyes tend to be a purplish hue, it's a wise idea to use a concealer with a hint of a yellow undertone to it.  Take a powdered foundation and dust it along your face, making sure not to create any harsh lines.  Remember, blending is key. Take an eyebrow pencil or eyebrow powder (it's mostly what I used) and fill in your brows.  Blend out the color a bit to make them look more natural.

Now with a white glimmering eyeshadow, apply to the inner corners of your eyes.  This will help to make your eyes look bigger.  Take a shimmering silver eyeshadow and apply to the middle of your eyes. Blend the white and silver eyeshadows to remove any harsh lines.  With a metallic grey eyeshadow, apply to the outer corners aka the outer V of your eyes.  You can now blend the colors with a blending brush, a Q-tip, or eyen your index finer (whatever works for you).  Line your upper lashline with a black eyeliner pen.  Wing the tip out once you get to the outer corners of your eyes. Now take a black eyeshadow and line the upper lashline and 3/4's of the lower lashline.  Blend it out with a Q-tip (easier to blend it this way).  This makes for a smokey effect.  Once you're done, curl your lashes and apply a volumous mascara for a dramatic effect.

Instead of blush, take a small amount of bronzer and apply to the apples of your cheeks. Gradually build the color up to avoid putting on too much.  Finally, take a peach-colored lipgloss and apply to your lips.  Now you're finished :)

So here is the final look:


For this tutorial I used short dresses but for the next prom tutorial I'll use a longer dress.  Just wanted to show variety in case some girls wanted to wear a shorter dress.

Dress: Dillard's (size 0)
Shoes: Glitter (size 7 1/2)
Necklace: Busch Gardens
Earrings: For Love 21

Dress: Body Central (size 0)
Shoes: Burlington's Coat Factory (size 7 1/2)

You don't just have to wear this look for prom.  It can be used for a nighttime event, a party, etc. I acutally wore this look a few years ago in my senior year when my relatives came to visit.


I hope you all have fun with this look and to those girls who are going to prom this year, I hope you all have a magical night to remember :)

Sunday, March 27, 2011

o0SerenityAngel0o: The Versatile Blogger Award

Happy Sunday everyone!  I hope you all are having a good weekend. I wanted to thank Blissfully Ke again for giving me the Versatile Blogger Award. 


It really means a lot to me :) The rules of the award are:
  • Thank the person who gave you the award and link the blog back to them
  • Tell us 7 things about yourself
  • Award 15 new bloggers
  • Contact the bloggers to let them know they've received the award
Ok, so here are 7 things about moi! :)
  1. I'm half African American and half Burmese.
  2. I was orignially born in Perth, Australia but I moved to the U.S. when I was a baby so no accent :/
  3. I used to play the piano and violin when I was in elementary school.
  4. My boyfriend Mitchel and I have been dating for a year and 9 months but we've known each other since 7th grade.
  5. I actually ran for prom queen in my senior year in high school but ended up runner-up.
  6. My favorite color is blue but I'm allergic to blue food coloring :/
  7. My blogger name is actually my alias for videogames whenever I go head-to-head with my cousin and his friends.
So instead of giving this award to 15 new bloggers, I've decided to give this award to all new bloggers who are reading this post.  I believe that everyone deserves this award because everyone's blog is unique and different and we all have something new and creative to share to the world. :)

Before I bid you all adieu, I'd like to give you all a preview of the next tutorial coming up:

Going to prom this year?  Get ready for the Under the Starry Sky Makeup Tutorial!

xoxo
 Sammy <3

Tuesday, March 22, 2011

Hello Kitty Bonanza!!!!!

Hellooo everyone! Happy Tuesday! lol Hope you all are having a great week so far.  So I promised that one day I'd do a post of all of the Hello Kitty accesories, food, etc. Some of the items on this post are gifts so I do not know where they came from or how much they cost.  Well look no further because here it is! :)

 So here is the first item of the Hello Kitty Bonanza!!!

2011 Hello Kitty calendar $7.99


Hello Kitty headband bought froma beauty boutique cart $7.99


Hello Kitty hair bows for $4.95 from the Sanrio store

Hello Kitty hair tie for $4.95 from the Sanrio store


Chococat compact mirror $3.95

Blue Hello Kitty charm from Sanrio store
 Orange Cinamoroll charm (gift)

Pirate Hello Kitty key cap

Beach Hello Kitty key chain from McDonald's

Hello Kitty and My Melody watches from McDonald's (couldn't resist XP)

Hello Kitty lunchbox

Hello Kitty tupperware and water bottle

Hello Kitty Pocky

Hello Kitty Milk candies

Hello Kitty watch necklace fom Hong Kong

Hello Kitty bejeweled watch (this is the box it came in)


This is my most favorite accessory and I can't leave the house without it.


Hello Kitty ring watch $16.95 from Sanrio store


Hello Kitty bejeweled earrings from Bahrain

Remember in my Updates post I said that my boyfriend and I were working on a special Hello Kitty project?  Well we finally finished it on the last day of Spring Break!  I gotta say though it was a lot of fun.  Here is what it looked like before it was painted:


 And so here it what it looks like finished:


Cute huh?  We spent all break drawing, cutting, and painting it but all in all it was a lot of fun and I got to spend the whole Spring Break with my hubby too.  It's a pretty neat project to do with a friend, boyfriend/girlfriend, or sister.  Well I hope you all have enjoyed this post and stay tuned for the next one! Until next time! ^-^

Bye from me and my boyfriend's cat Albert :3
Related Posts Plugin for WordPress, Blogger...