Followers

Friday, April 29, 2011

2NE1's Sandara "CAN'T NOBODY" Look

Hello everyone! TGIF!!! lol Hope you all are having a great week if not there's always the weekend.  Finals start next week so for those who are in college like myself, I wish you luck :)  So here is a new tutorial featuring the ever so lovely Sandara Park from 2NE1.


I posted the music video below the photos.  Sandara's makeup in the MV is so vibrant and gorgeous and it's great for going to clubs and parties.  I'll admit it was a bit difficult to recreate this look due to the different shades of purple and hints of hot pink but once you finish this look I swear to you that it's worth the trouble.


Products Used in This Tutorial:
Clinique concealer in 05 Medium Beige
bare Minerals foundation powder in Summer Bisque
bare Minerals Mineral Veil powder
Smashbox Brow Tech & Cream Eye Liner Palette
Ulta eyeshadow kit (matte purple, shimmering lilac, shimmering white, hot pink)
Victoria's Secret eyeshadow in Blindlight
Sephora's eyeliner pencil in White
Ulta gel eyeliner in Black
Smashbox Lash DNA mascara
Ulta blush in Pretty in Pink
Victoria's Secret lipstick in Kiss Me
 
So as always start off with a freshly cleansed and moisturized face.  Cover up any dark spots or shadows under the eyes and around the mouth and nose with a yellow toned concealer to cancel out the purple hues.  Be sure to define your eyebrows with an eyebrow pencil or powder.  Take a liquid foundation or powdered foundation and apply/dust it on your face with a kabuki brush.  Use a translucent powder to finish prepping your face.

Now take a matte purple eyeshadow and cover your entire eyelid with the color.  This is going to serve as a base for the rest of the colors we're using.  Take a lilac eyeshadow and apply towards the middle of your eye.  For this step, I used Victoria's Secret eyeshadow in Blindlight.  Now take a shimering lilac color and apply it over the first lilace color.  Take a dark purple and apply it over the rest of the matte purple.  In the inner corners of your eyes, take a hot pink eyeshadow and apply it here then lightly blend it in so the colors transition together.  Now the easy part: the white lines pattern.  Take a white eyeshadow and draw small lines on you eyes.  If you need to, you can practice drawing them on the back of your hand.  Take a white eyeshadow and lightly dab it onto each line to make the white stand out. You can also apply white eyeshadow to your brow bone to define your brows as well.

Take a black gel eyeliner and line your eyes, winging them out a bit at the ends.  Curl your lashes and apply on a volumous mascara.  If you want, you can apply on falsh lashes for a dramatic effect.  With a pink blush, apply it to the apples of your cheeks.  Finally, take a pink lipstick and apply to your lips.  Now you're finished. :)

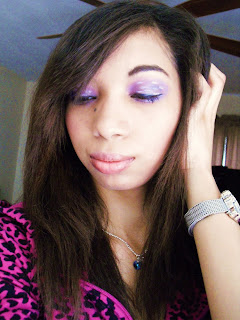
So here is the final look:


Wardrobe Used in This Tutorial:
Hoodie from Walmart
Shorts from Forever 21
Shoes from Lady's Footlocker

Since I didn't have any cloth that was like in the MV, I got creative and made a Hip-Hop outfit instead.  It was actaully pretty fun doing the shoot for this tutorial since I got to play around with this outfit (though I would never actually wear it out in public :P)

It's a very beautiful look and goes well with any eye color especially brown eyed girls.  I hope you all have fun with this look.  Good luck!
Monday, April 25, 2011

Update: Upcoming Tutorials and Possibly a Haul Coming Soon

Hey everyone!  I hope you all had a great Easter!!! I went to Busch Gardens over the weekend with my huge family and boyfriend but unfortunately I didn't get to buy any picture :/ Yeah sorry about that but I promise to post some up next time I go :)  I've been pretty busy with finals and papers :/ Ugh it's driving me insane! Is anyone else having this problem?  Well at least I get to go to Disney with my boyfriend and his family right after!!! Can't wait! Definitely taking lots of pics. :)

So what has been going on in my life? Well besides this weekend, I recently went to an award ceremony at my university and received a medallion for completing my Leadership Lecture Series as well as accepted an award with my friend Alan for APASU winning the Intercultural Initiative of the Year Award.  :)

I've also been working on some new tutorials as well as a haul post.  Got some pretty nail polishes, clothes, and acessories to show you all so stay tuned for that!

Koda Kumi's POP DIVA Makeup I wore for the ceremony.  Tutorial will be coming very soon!

Thursday, April 21, 2011

Laneige Natural Beauty Makeup Tutorial

Hello everyone!  A few days ago I was waiting for my food to be cooked at a Chinese takeout so I decided to look through a few beauty magazines that the restaurant had.  I was flipping though pages until I saw an ad for Laneige and I caught myself admiring the model.  Her makeup was simple and flawless yet sophisticated.  Inspired by the ad I decided to create a makeup tutorial based off of the beautiful models in the Laneige beauty products ads.


Products Used in this Tutorial:
Clinique concealer in 05 Medium Beige
bare Minerals foundation powder in Summer Bisque
Ulta eyeshadow kit (peach eyeshadow)
Victoria's Secret eyeshadow in Gaudy
L'Oreal Telescopic Explosion mascara
Ulta blush in Warmth
Victoria's Secret lipgloss in Toy

The key thing in this tutorial is to have a very moisturized, cleansed face.  This makes a difference in how well your makeup will be applied since it is your canvas.  First step is to wash your face with a good cleanser to remove any dead, flaking skin, dirt and oil on your face and in your pores.  Rinse your face thoroughly and pat it dry with a towel.  Use a moisturizer to hydrate your skin and give it a couple of minutes for it to be absorbed into your skin.  Be sure to tidy up your brows beforehand.  You won't need to fill them in since we're going for a natural look. 

Now with concealer, apply to your dark spots and shadows under the eyes as well as around the corners of your mouth and nose.  Use a liquid or powdered foundation to set your face ready for eyeshadow and blush.  With a matte tan/peach color apply it on your eyes to brighten your eyes.  Blend it out to soften the color.  Use a light golden eyeshadow and apply to the inner corners of your eyes to make them look more awake. No eyeliner is necessary so we're going to skip that part and move on to mascara.  To really achieve that natural look, go for a brown mascara.  I currently don't have any so I just used a black one instead.  The difference is that your lashes will look darker than usual but other than that it'll be prefectly fine.  Take a peach colored blush and apply to the apples of your cheeks.  Finally take a pink lipgloss and apply to your lips.  Now you're finished. :)

So here is the final look:


This look is perfect for those who are beginning to wear makeup or who just want a simple look to wear everyday.  It's not about hiding your flaws but more about enhancing your features such as your eyes, mouth, and skin and bringing out your natural beauty. 


Wardrobe Used in This Tutorial:
Shirt from New York & Company
Shorts from Forever 21
Shoes from Payless
Earrings from Forever 21
Watch is a gift from Australia :)

I didn't realize until after doing this tutorial that my wardrobe is similar to that of the girls in SNSD in this picture :)


I hope you all enjoy trying this look out and be sure to stay tuned for my next post.  Until next time!

P.S. I also want to apologize for the view of the photos in my tutorials.  Trust me, the pigments of the eyeshadows I use are much more vibrant than those in the photos.  It's very hard to get good lighting with the camera that I'm currently using but hopefully they'll get better once the sun comes  out more :)

Tuesday, April 19, 2011

Once Upon a Time Prom Princess Makeup Tutorial

Hi everyone! Finally the warm weather is coming out and I can finally wear my new Forever 21 shorts. TeeHee :) Anywho, prom season is coming closer so I decided to create another look for all of you girls.  This look is perfect for that girl who wants her happily ever after to come true.  Adorned with pink hues, your eyes will look so soft and romantic as you dance the night away with your Prince Charming (yeah I know it sounds corny :/).


Products Used in This Tutorial:
NARS Smudge Proof Eyeshadow Base
Clinique concealer in 05 Medium Beige
bare Minerals foundation powder in Summer Bisque
bare Minderals mineral veil
Smashbox Brow Tech & Cream Eye Liner Palette
Ulta eyeshadow kit (white, matte pink, pearl pink, hot pink, and black (brown optional) eyeshadows)
Utla gel eyeliner in Black
Smashbox Lash DNA mascara
Utla blush in Pretty in Pink
Victoria's Secret Lipstick in Babydoll
 
After washing and moisturizing your face, apply concealer to your dark spots and shadows around the eyes, nose and mouth.  Use foundation to set your face ready for makeup.  Lightly fill in your eyebrows with an eyebrow pencil or powder.

Take a shimmering white eyeshadow and apply to the inner corners of your eyes.  This will brighten and widen your eyes.  Now take a matte pink color and apply to the center of your eyes to serve as a base color.  With a pearl pink color, apply it ontop of the matte pink and blend it out with the white eyeshadow.  Now take a hot pink color and apply to the outer corners of your eyes, making sure to blend it out with a Q-tip or your index finger.  Use an angeled brushed loaded with black gel eyeliner and line your upper lash lines.  For the lower lash lines, take a small brush or Q-tip, load it with black eyeshadow (or brown eyeshadow for a softer look) and apply to your lower lash lines from the outer corners to the middle of your eyes.  Curl your lashes and apply on a volumious mascara for fuller lashes.

Take a pink colored blush and apply to the apples of your cheeks, gradually building up the color. For your lips, take a matte pink lipstick and apply to your lips.  Now you're finished :)

So here is what it looks finished:


Wardrobe Used in This Tutorial:
Dress is from Dillard's (size 0)
Headband from Forever 21
Necklace and earrings from Glitter

This is actually the dress I wore in my senior prom when I ran for prom queen.  Even though I didn't win, I still had a lot of fun and it was a great way to end my senior year.

I hope you have a wonderful time at prom.  I know I sure did both times :)  Good luck!


Wednesday, April 13, 2011

Videogame Vixens 2nd Look: Bayonetta Glasses Makeup Tutorial

Hello my beautiful bloggers! I've been a very busy bee with school work and my Aussie relatives in the U.S. but I haven't forgotten about you guys and gals. :)  Seeing how popular the Lara Croft look was, I decided to create another tutorial but this time with a badass witch.  A what?  A witch! Here is the 2nd Videogame Vixens Tutorial starring Bayonetta.


Bayonetta is a very mysterious and seductive witch who tends to shapeshift, use firearms, and magical spells to fight against her foes.  The gameplay is similar to that of the Devil May Cry series yet the graphics are fascinating and high definition.  I personally don't own a PS3 :( but if I did this game would definitely be on my To Play List.  The facet that the colors of her makeup are very cool yet vibrant make her look very alluring and ravishing behind her dark spectacles.  This look is perfect for anyone who wears glasses or is going out to dinner on a date.  Either way, you will look simply "bewitching."


Products Used in this Tutorial:
Clinique concealer in 05 Medium Beige
bare Minerals foundation powder in Summer Bisque
Smashbox Brow Tech & Cream Eye Liner Palette
Ulta Eyeshadow (blue metal, midnight blue, and matte purple)
Victoria's Secret Eyeshadow in Blindlight
Ulta gel eyeliner in Black
L'Oreal Telescopic Explosion Mascara
Ulta blush in Bubblegum Pink
Victoria's Secret lipgloss in Toy

As always start off with a clean and moisturized face.  Fill in your brows with eyebrow powder or an eyebrow pencil. Use concealer to cover up dark spots and shadows on your face then use foundation to prep your face up for blush later.

With a baby blue eyeshadow fill in your eyes from the inner corners to the middle.  Take a midnight blue eyeshadow and fill in the rest of your eyes from the middle to the outer corners.  Blend the two colors together so that they will transition.  Now take a lilac color and apply right above the blue eyeshadows.  Take a matte purple and apply over the lilac eyeshadow to intensify the colors.  Remember to blend the colors together once you finish.  Line your eyes with a  black gel eyeliner and wing it out at the outer corners.  Be sure to curl your lashes and apply on a lengthening mascara.

Use a light pink blush on the apples of your cheeks and apply a nude lipgloss to your lips.  I actually ran out of my lipgloss so I opted for a pink one instead.  Either color will work.

So here is the final look:


I created two outfits for this look: one to recreate Bayonetta's outfit but more wearable for everyday and one for nightlife.


Wardrobe Used for Outfit #1:
Shirt from New York & Company
Pants from Forever 21 (size 0)
Shoes from Burlington's Coat Factory (size 7 1/2)
Earrings from Forever 21
Glasses from Lenscrafters


Wardrobe Used for Outfit #2:
Dress from Forever 21 (size sm)
Shoes from Burlington's Coat Factory (size 7 1/2)
Earrings from Forever 21
Glasses from Lenscrafters

I really hope you all with enjoy wearing this look no matter where you go.  And to close off this tutorial here is one of my favorite songs from the game.


Good luck and see you all in my next post!
Related Posts Plugin for WordPress, Blogger...